This scenario covers the following steps:
- create a target filter
- create and start a rollout on the devices included in the target filter
Table of contents:
Introduction
The previous section showed how an update can be installed to a single device.
Now we want to update a large number of devices to demonstrate how you can use the rollout management features.
We will use the hawkBit Device Simulator to set up some demo devices in order to simulate our global fleet. Then we will show how to manage them by means of target filters, before we can create a rollout to update all of them in a defined way.
Prerequisites
Creating many devices with hawkBit device simulator
One way of creating a large number of devices for demo purposes is the hawkBit Device Simulator.
While the simulator supports both the DMF and DDI APIs, we want to use DDI here. Therefore, we have to disable DMF as described in the README.md under hawBit APIs. Once the simulator is running, devices are created via REST.
For this example, we create three groups (emeadevice, apacdevice, amerdevice) with 10 devices each.
The respective replacement tokens are listed at Getting started > API Replacement Token.
$ curl 'http://localhost:8083/start?name=emeadevice&amount=10&tenant=<TENANT_ID>&api=ddi&endpoint=<HOST>&gatewaytoken=<GATEWAY_TOKEN>'$ curl 'http://localhost:8083/start?name=apacdevice&amount=10&tenant=<TENANT_ID>&api=ddi&endpoint=<HOST>&gatewaytoken=<GATEWAY_TOKEN>'$ curl 'http://localhost:8083/start?name=amerdevice&amount=10&tenant=<TENANT_ID>&api=ddi&endpoint=<HOST>&gatewaytoken=<GATEWAY_TOKEN>'Enabling the approval workflow
In certain cases, an update may have to be approved by a superior or responsible, before it can be rolled out.
This is supported in Bosch IoT Rollouts by the Approval Workflow feature.
To enable it, you have to go to System Configuration view > Rollout Configuration and enable Approve rollout before it can be started in the Management UI (Classic).
Create a target filter
Target filters help to manage devices by grouping them according to a query. They can be used in the creation of a rollout in order to select a large number of devices which will receive the update.
Additionally, target filters can be used for automatic assignments of updates. This process is explained at Create and manage auto assignments.
Via Management UI
To create target filters via the Management UI, follow these steps:
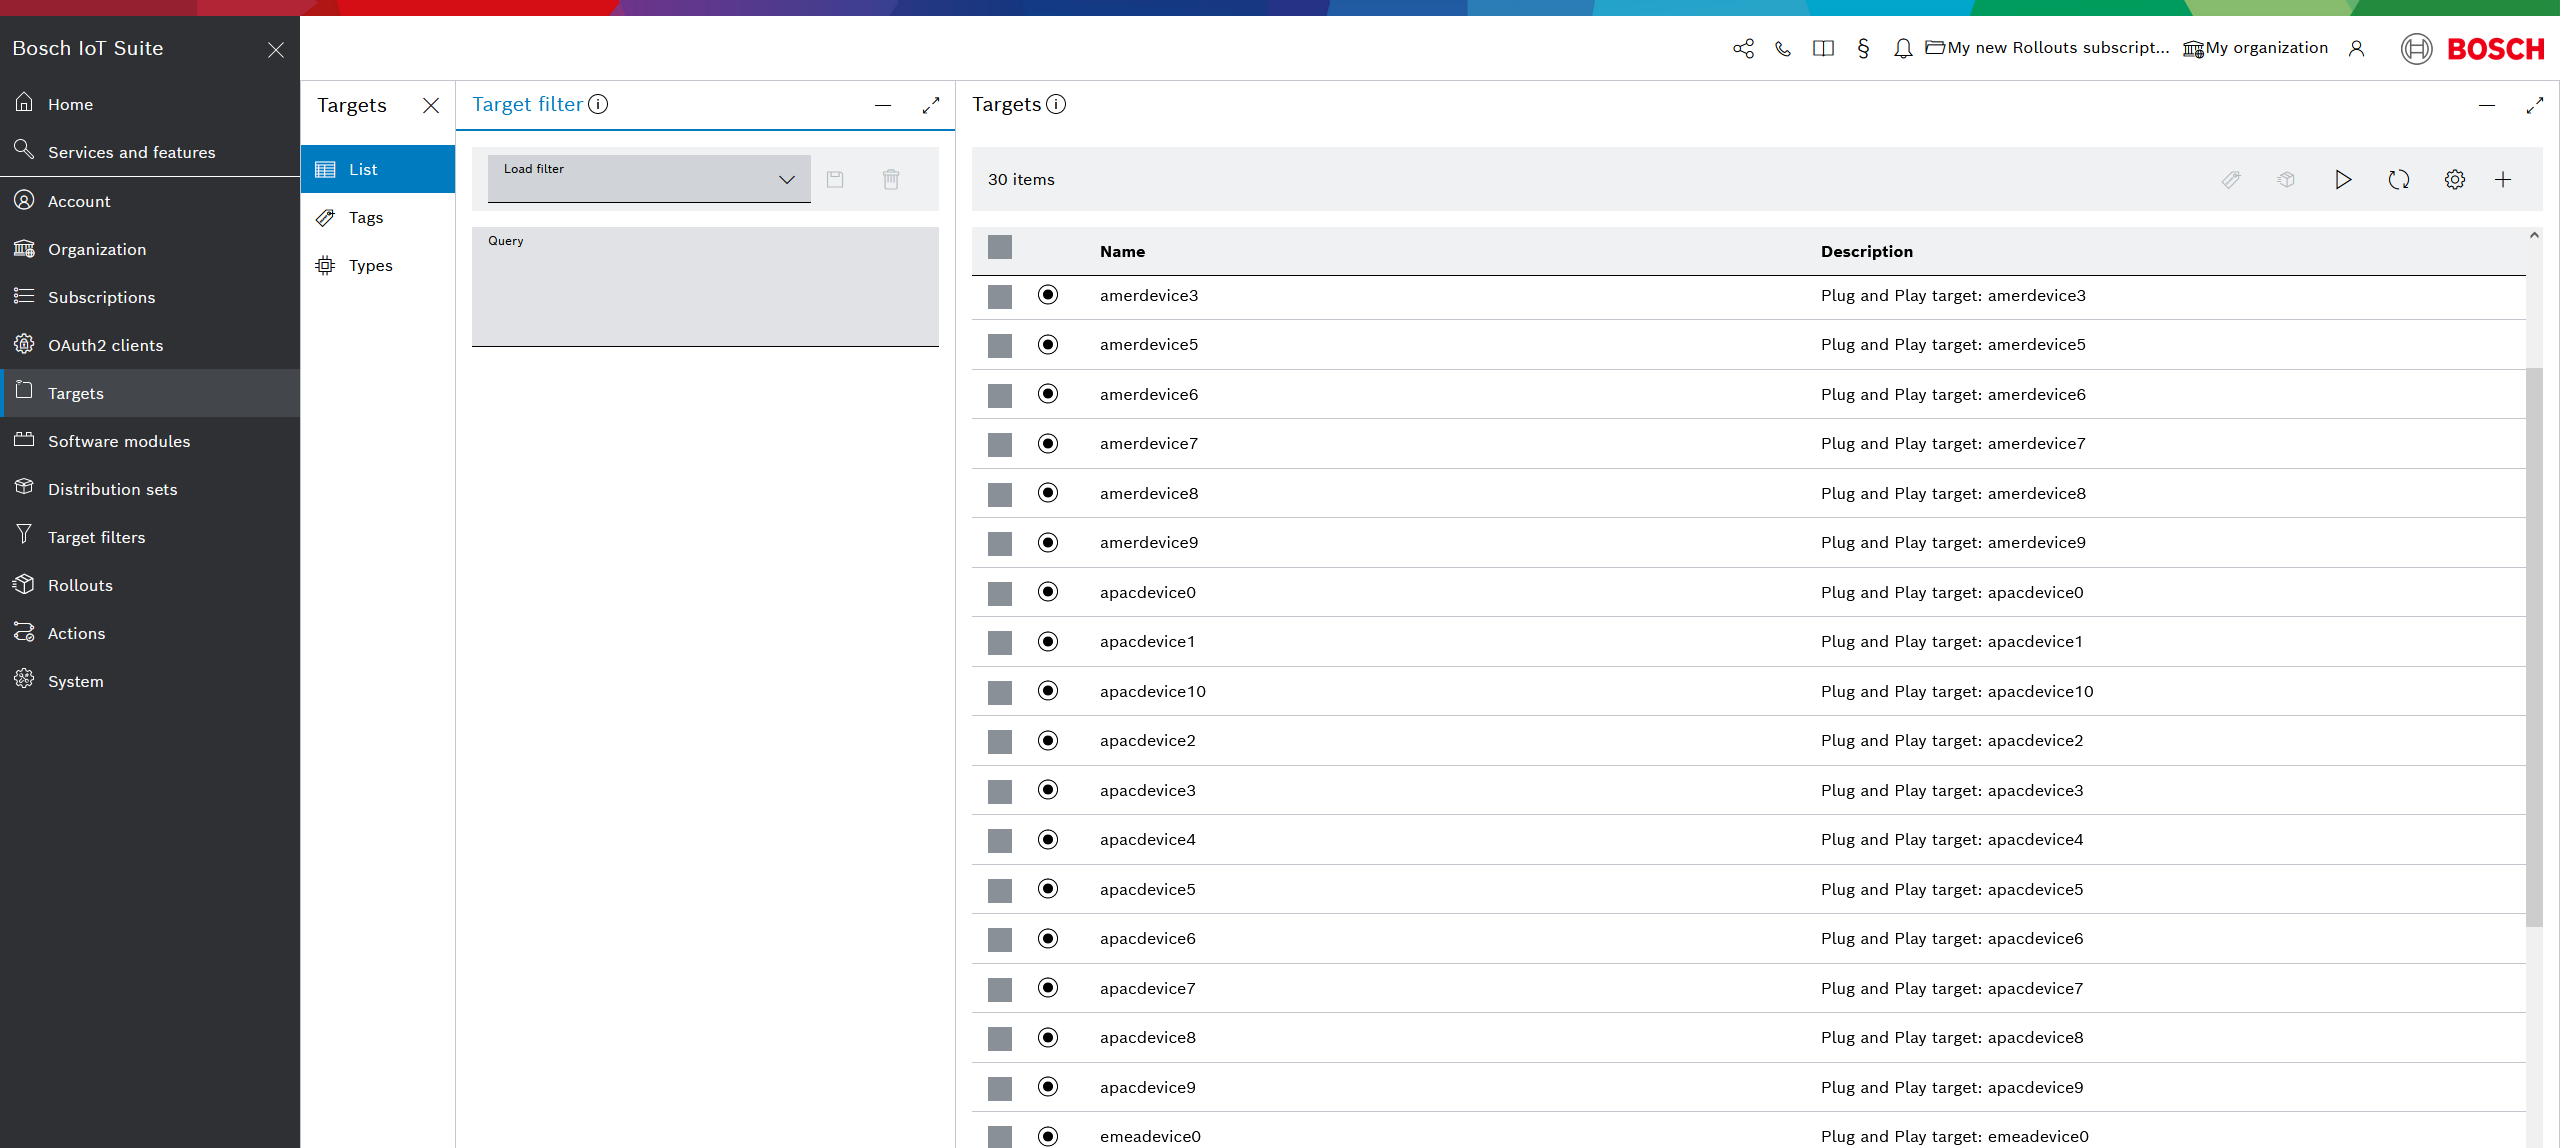
- Go to Targets from the left navigation. List should be opened by default in the sub-navigation.
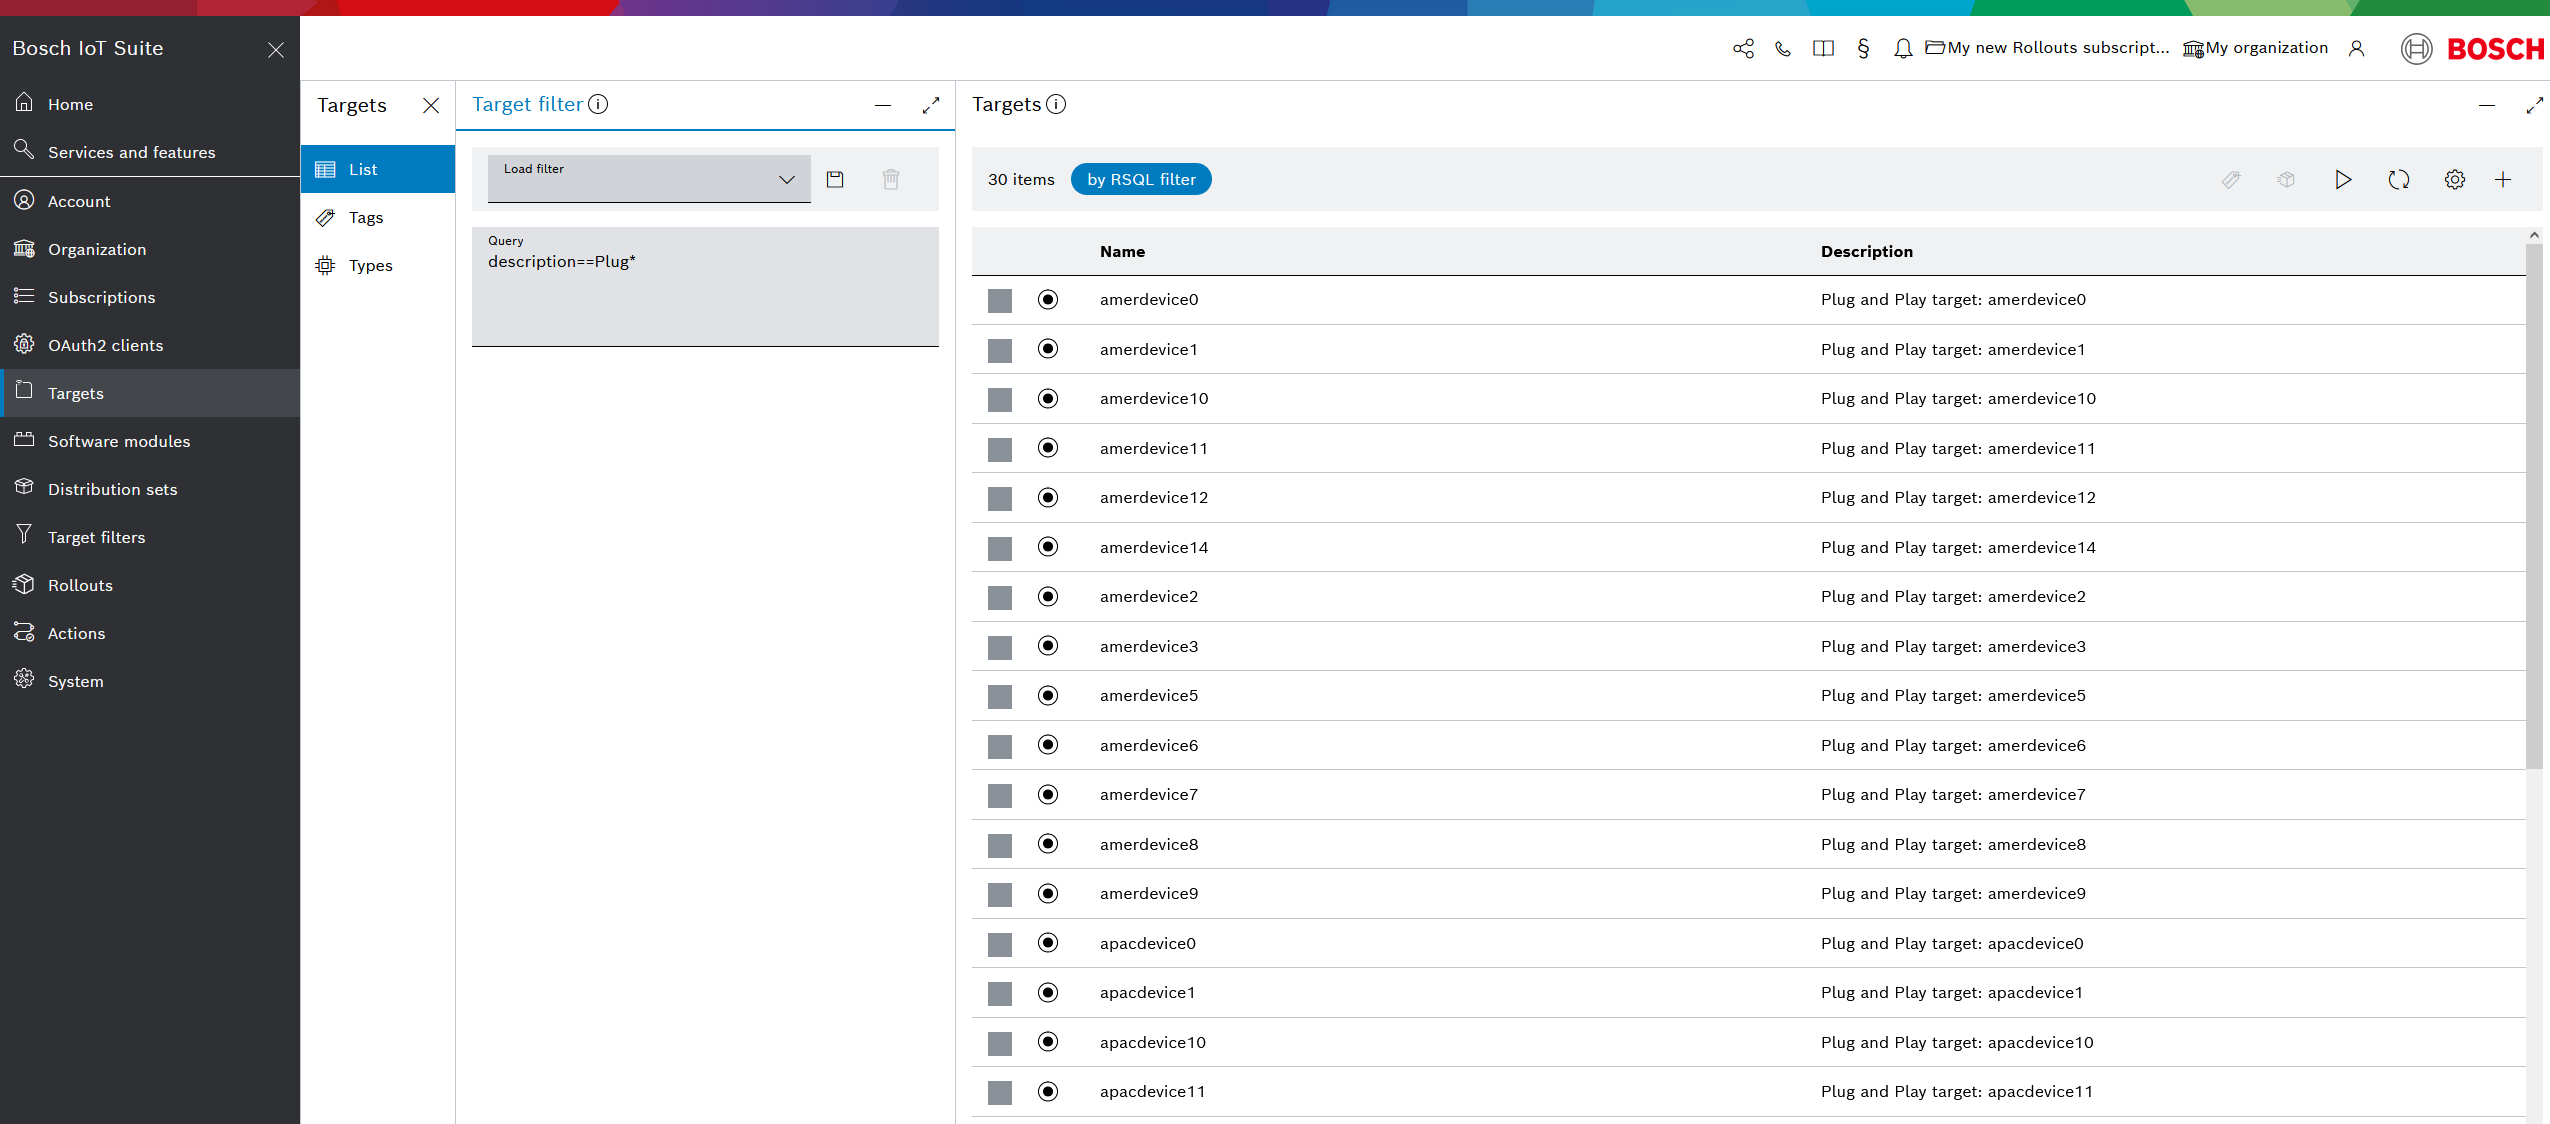
- Target filters are created in the Target Filter view. First type in a query, which filters all simulated devices e.g.
description==Plug*.
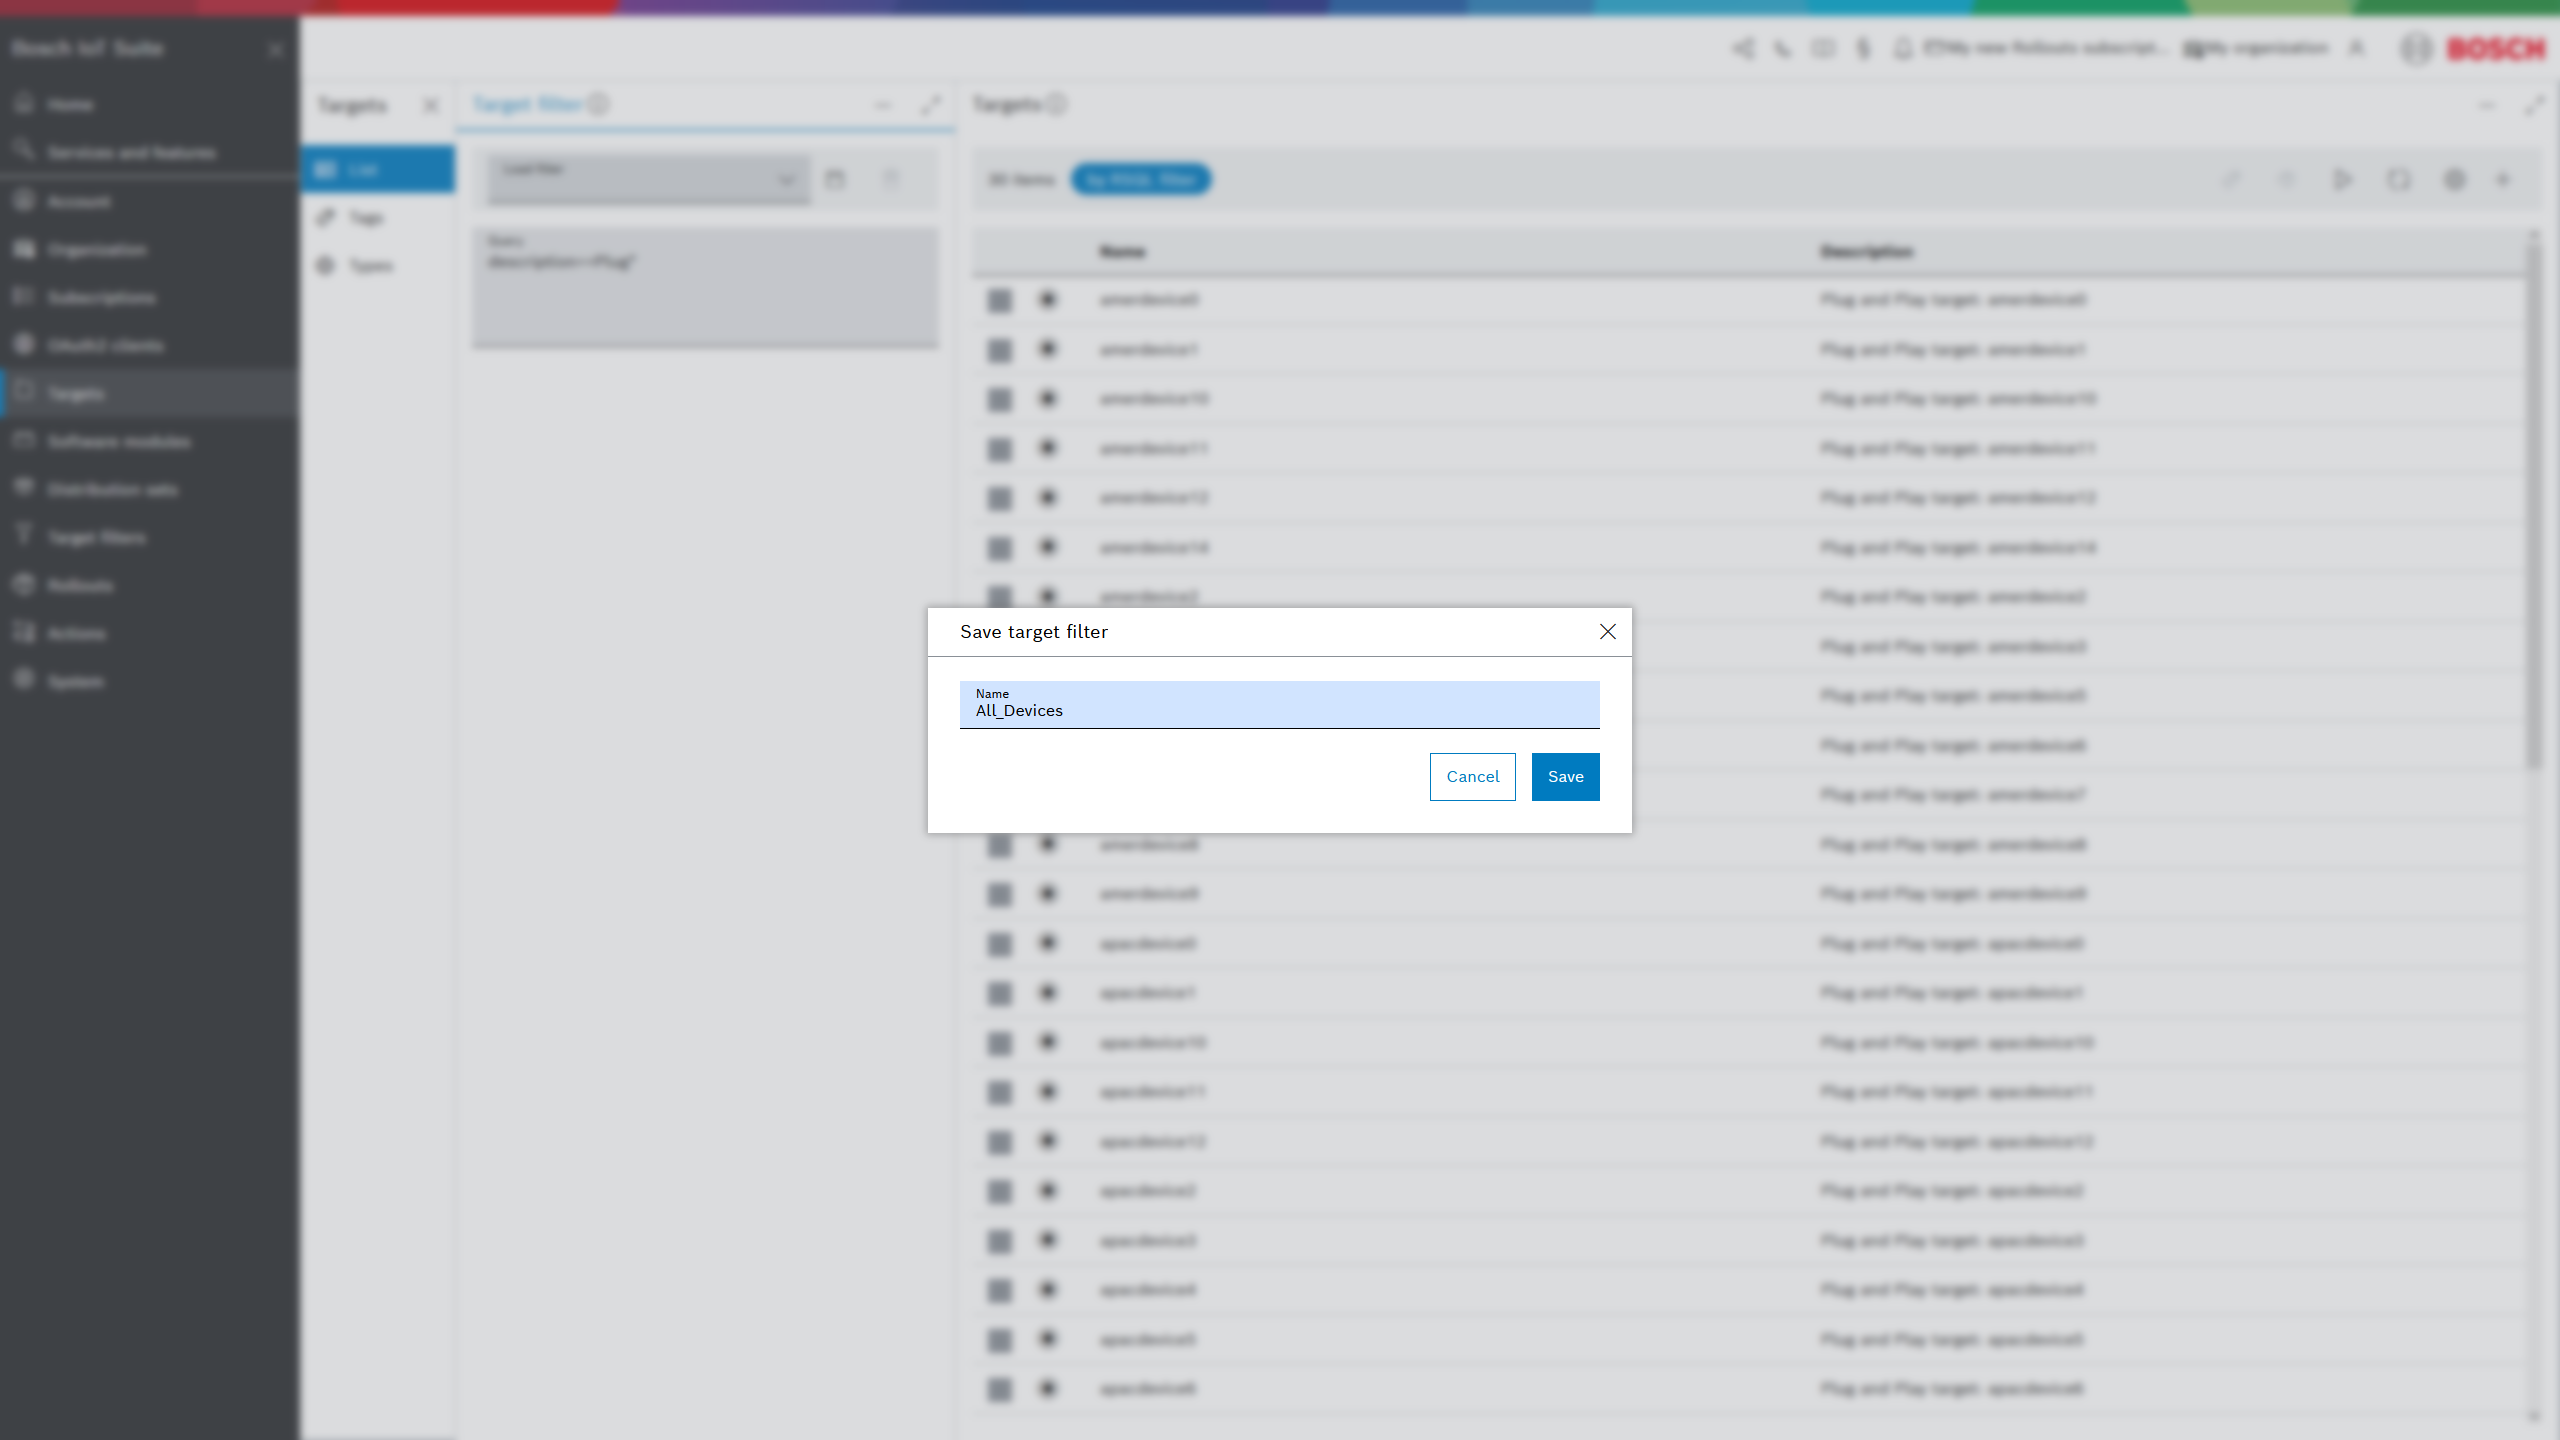
- Click the Save icon and type in a user friendly name e.g. All_Devices.
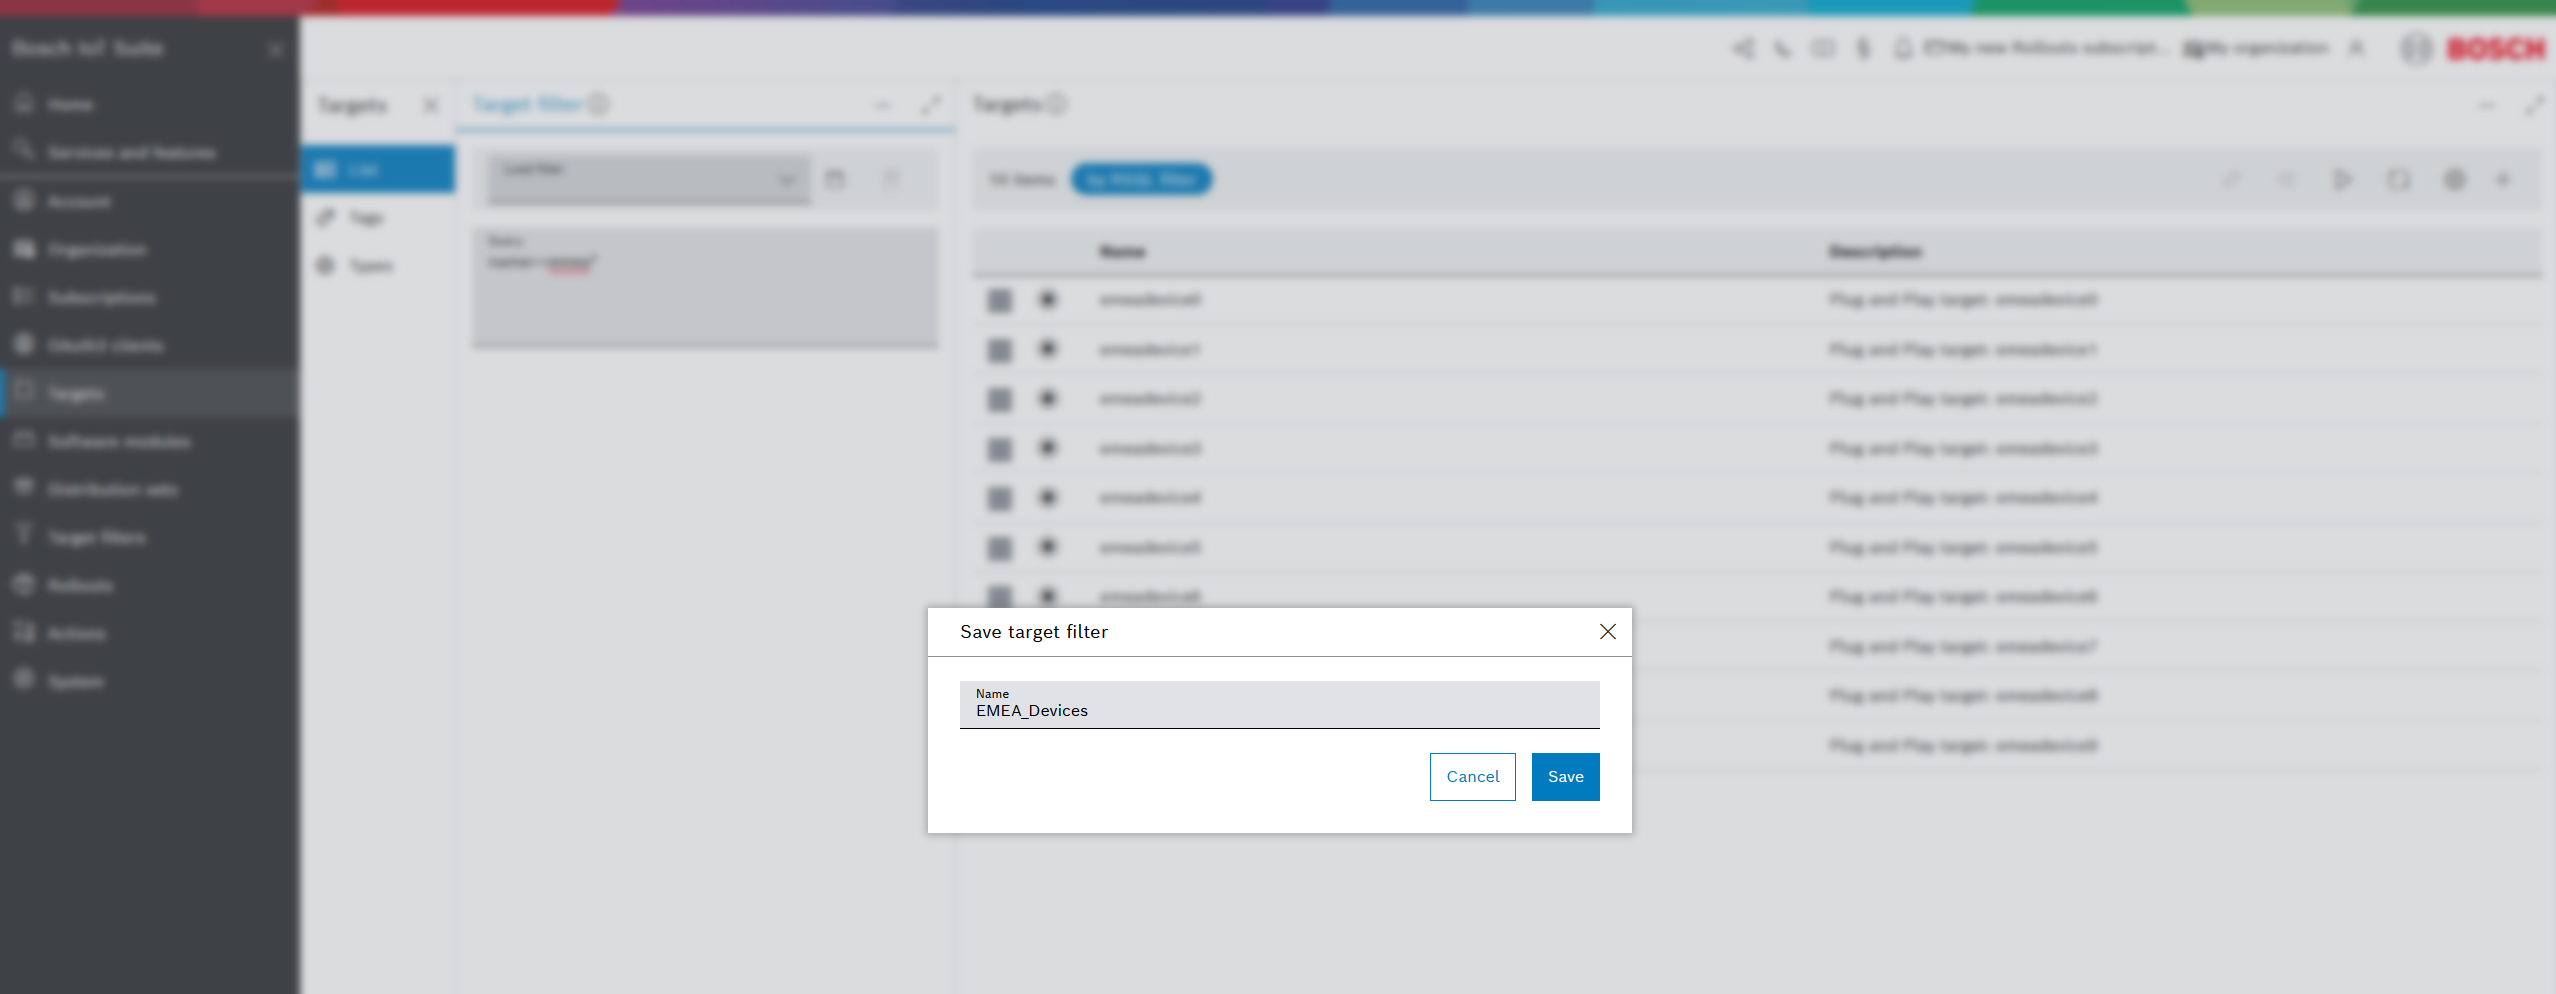
- Then let's create a target filter for each of our target groups based on regions. Use the following queries:
name==emea*name==apac*name==amer* - Respectively, save each target filer with a convenient user-friendly name.
EMEA_Devices
APAC_Devices
AMER_Devices - The applied target filter will be indicated by the blue chip with the corresponding name above the list of targets.
For a detailed guide refer to List and filter targets.
Via Management API
A target filter can also be created with a single REST call containing the query string (see syntax at Target filtering) and the desired name.
$ curl 'https://<HOST>/rest/v1/targetfilters' -u "<TENANT_ID>\<USERNAME>:<PASSWORD>" -i -X POST -H 'Content-Type: application/json' -d '{ "query" : "name==emeadevice*", "name" : "EMEA_Devices"}'{ "createdBy": "CLD:83717175-0650-400a-b6f2-9a4a398fc07a", "createdAt": 1530626882492, "lastModifiedBy": "CLD:83717175-0650-400a-b6f2-9a4a398fc07a", "lastModifiedAt": 1530626882492, "name": "EMEA_Devices", "query": "name==emeadevice*", "autoAssignDistributionSet": null, "autoAssignActionType" : null, "autoAssignWeight" : null, "confirmationRequired" : null, "_links": { "self": { "href": "https://<HOST>/rest/v1/targetfilters/75" }, "autoAssignDS": { "href": "https://<HOST>/rest/v1/targetfilters/75/autoAssignDS" } }, "id": 75}Use the same endpoint to create filters for:
APAC_Devices,AMER_Devices, andALL_Devices (name==*).
Create a rollout
At this step, let’s install an update to all provisioned devices by using the rollout functionality which represents a scalable and manageable approach for rolling out updates to a large number of devices.
Via Management UI
When using the Management UI, follow these steps:
- Open the Rollouts view from the left navigation and click the + icon in the far right.
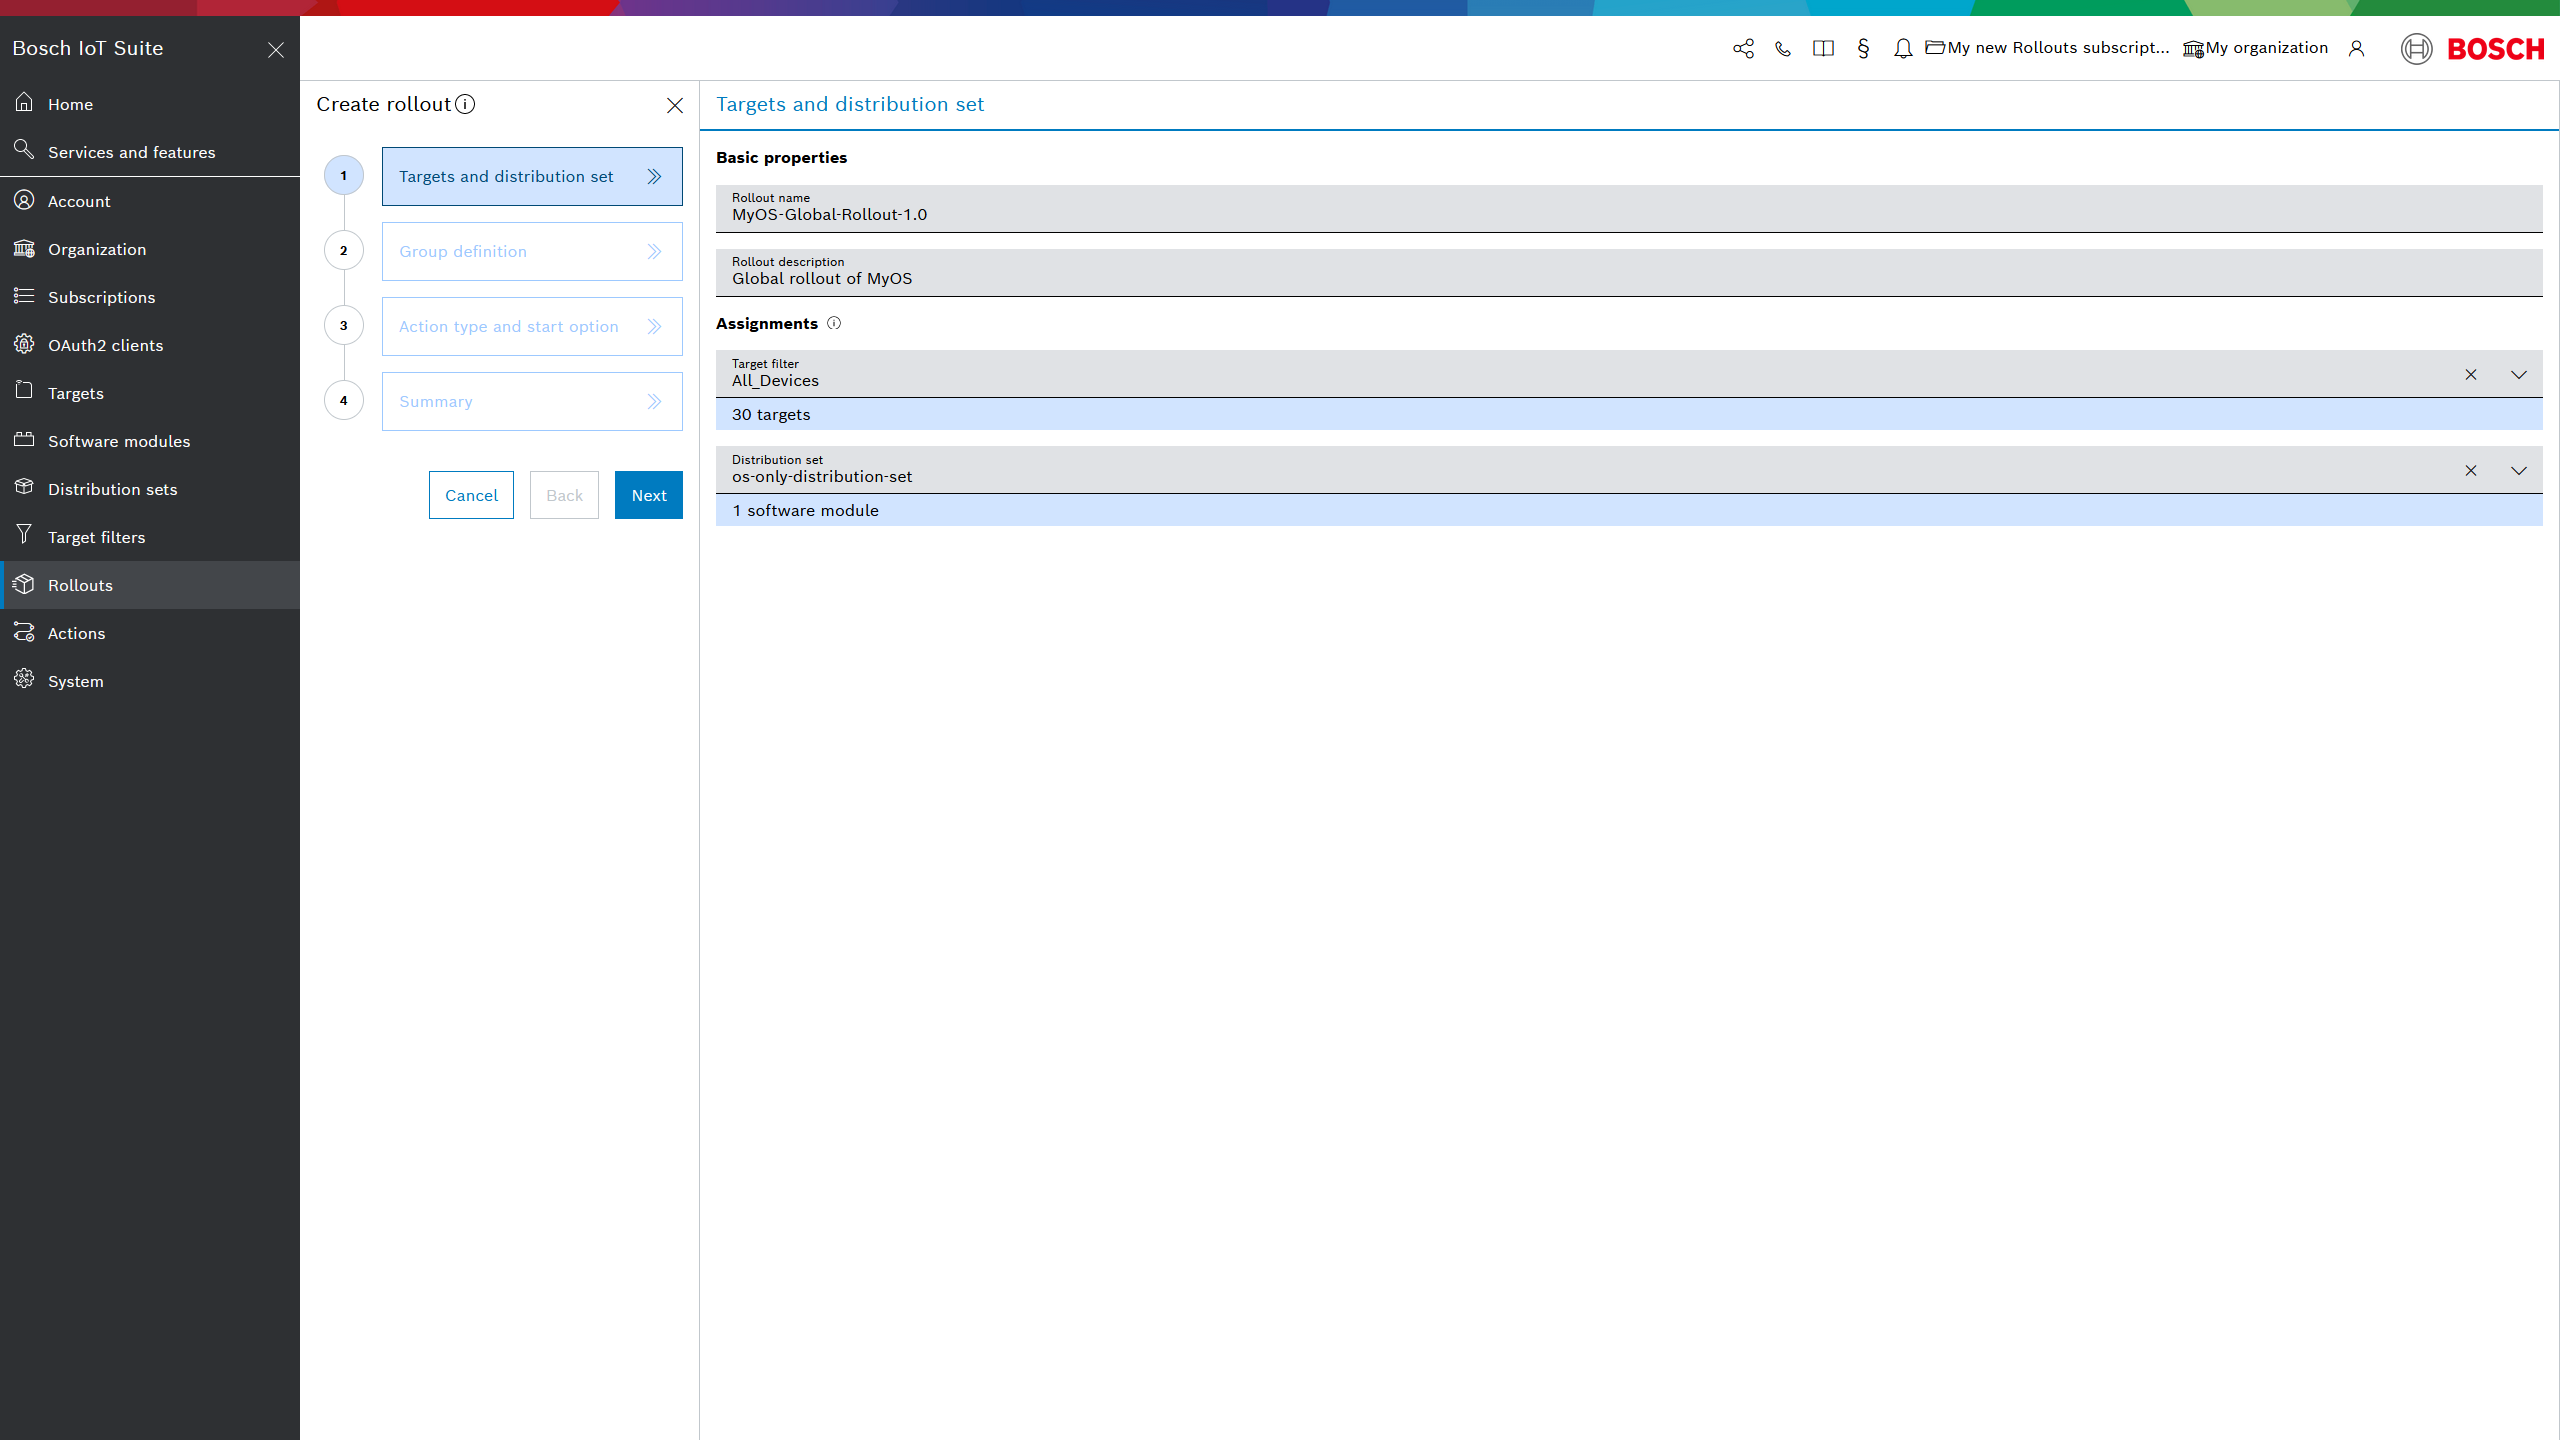
At the Targets and distribution set step of the wizard:
Type in a Rollout name which is unique within your tenant and an optional Rollout description.
Select the Target filter which contains all devices, which you just created. In our case, that would be All_Devices.
Select the respective Distribution set that you want to distribute to the devices.
- At the Group definition step of the wizard:
- Switch to the Advanced group definition tab.
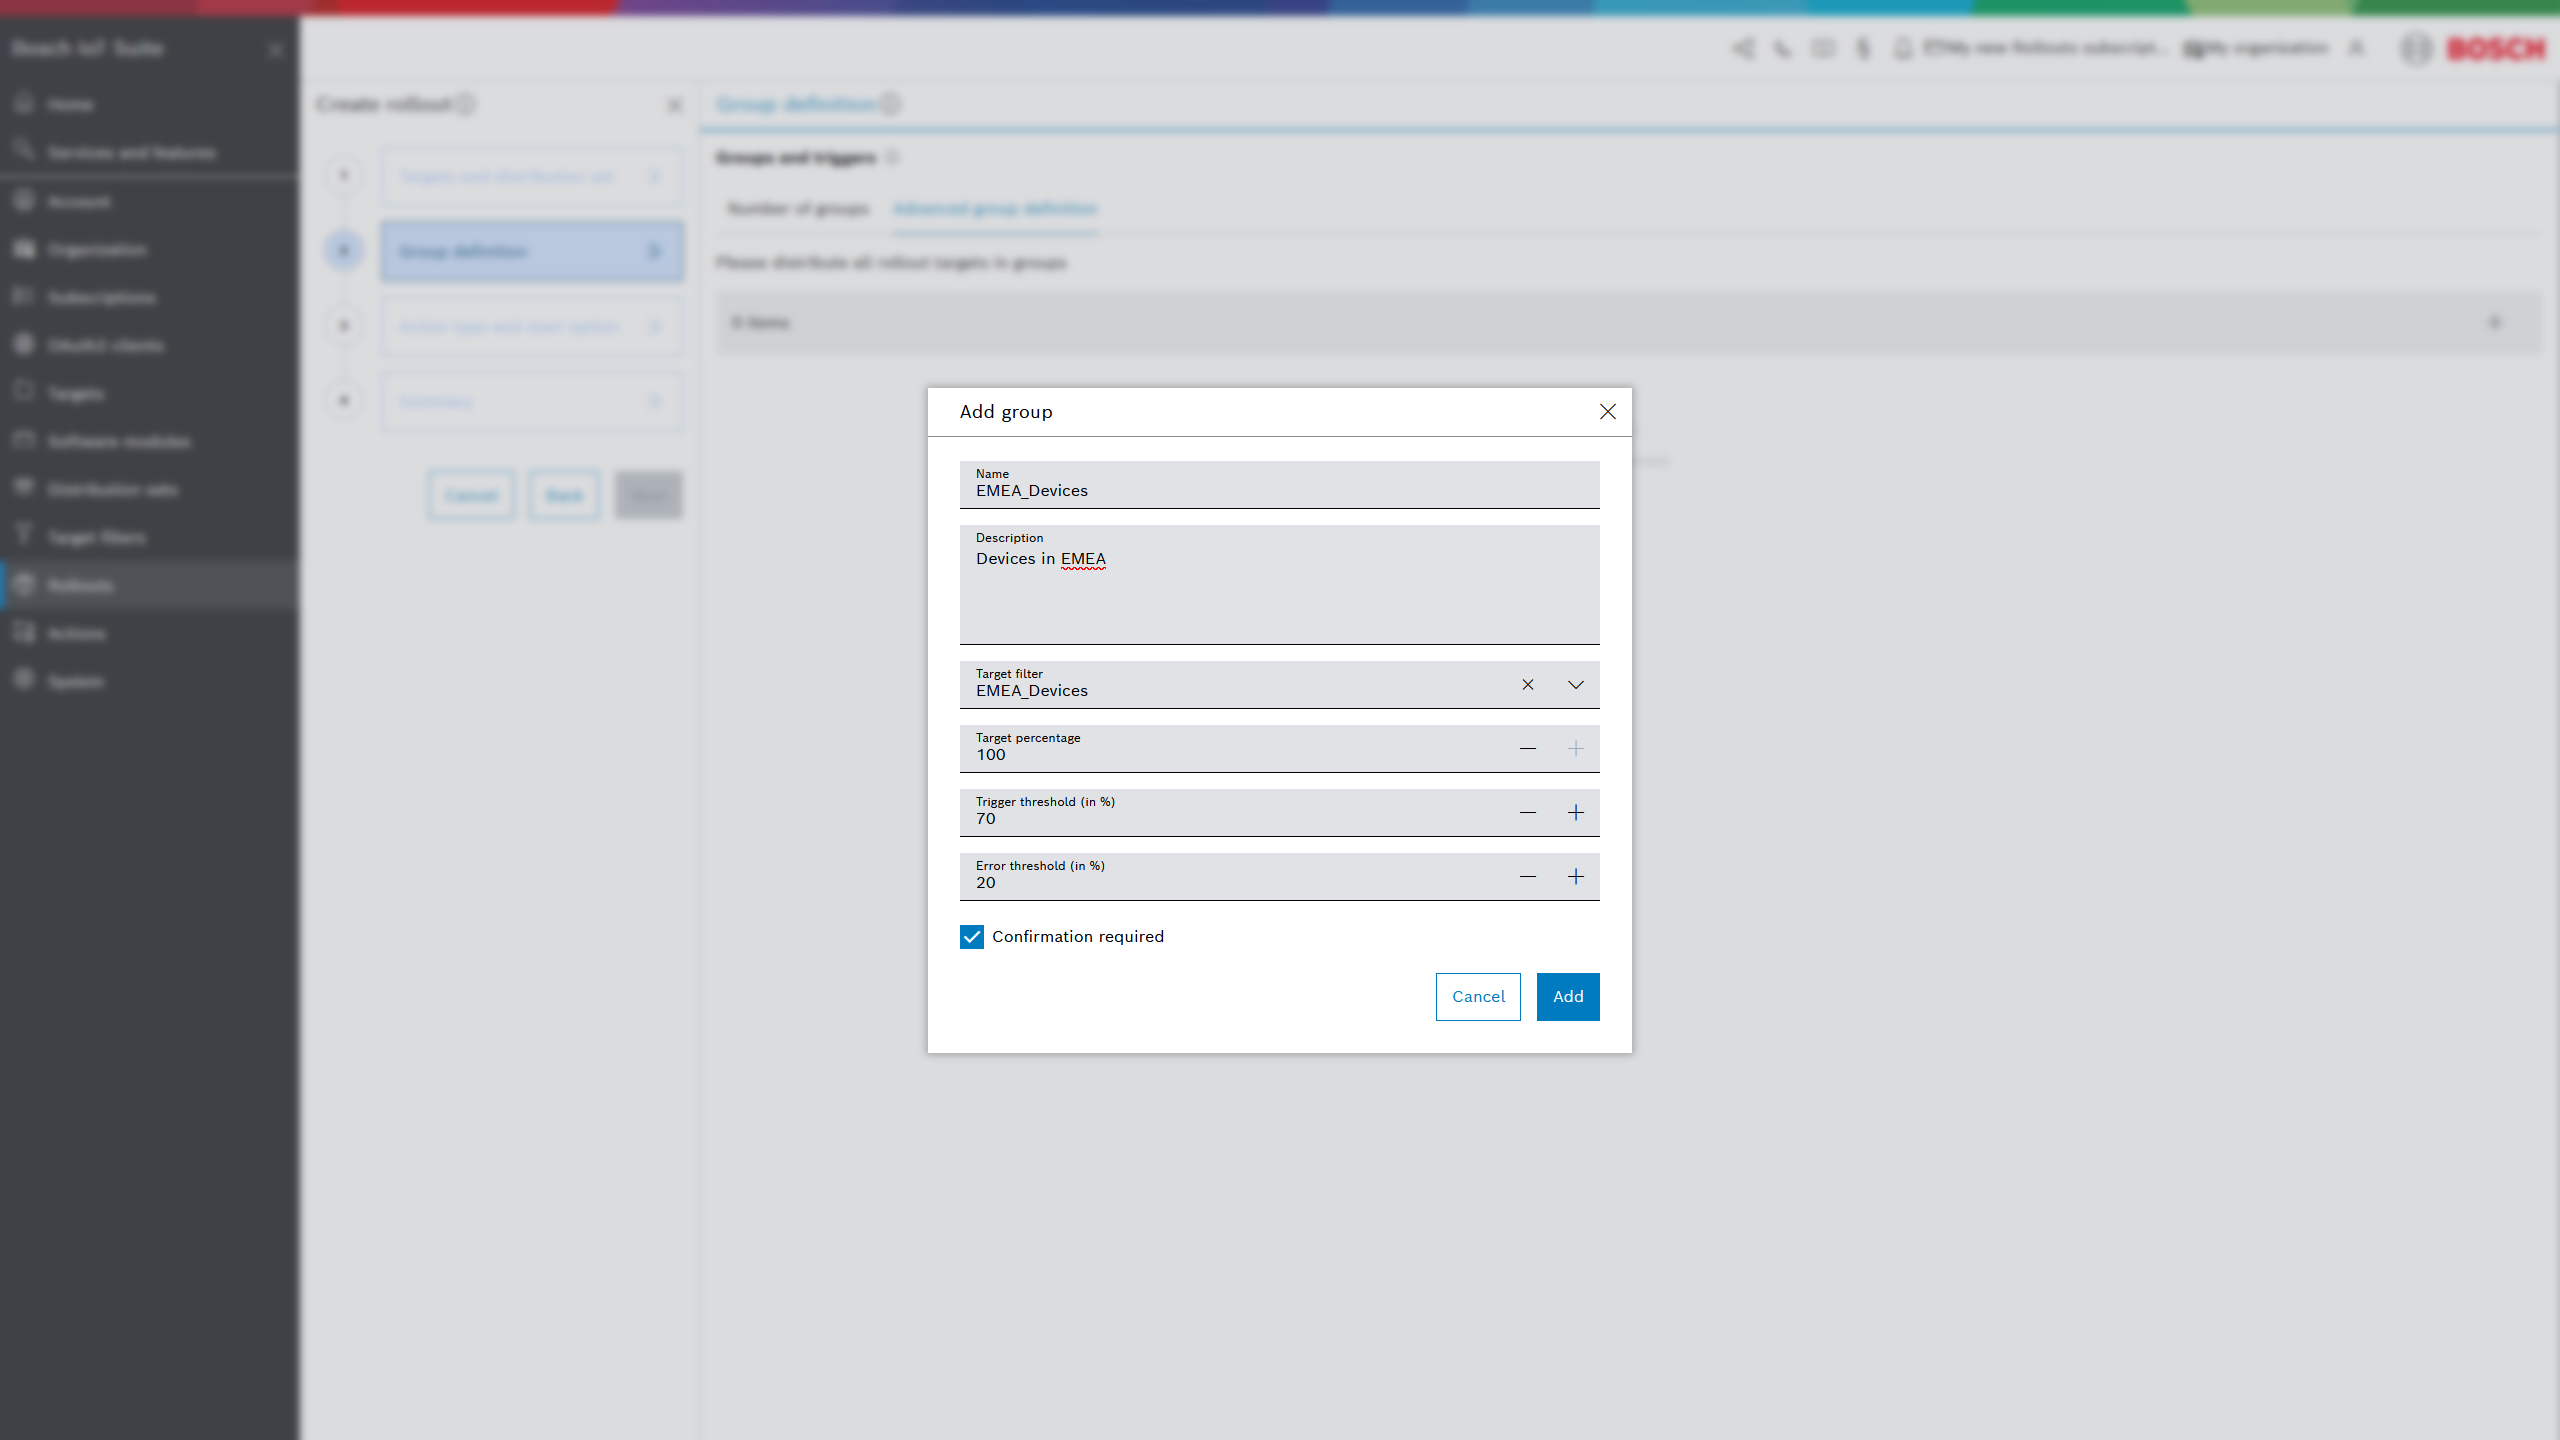
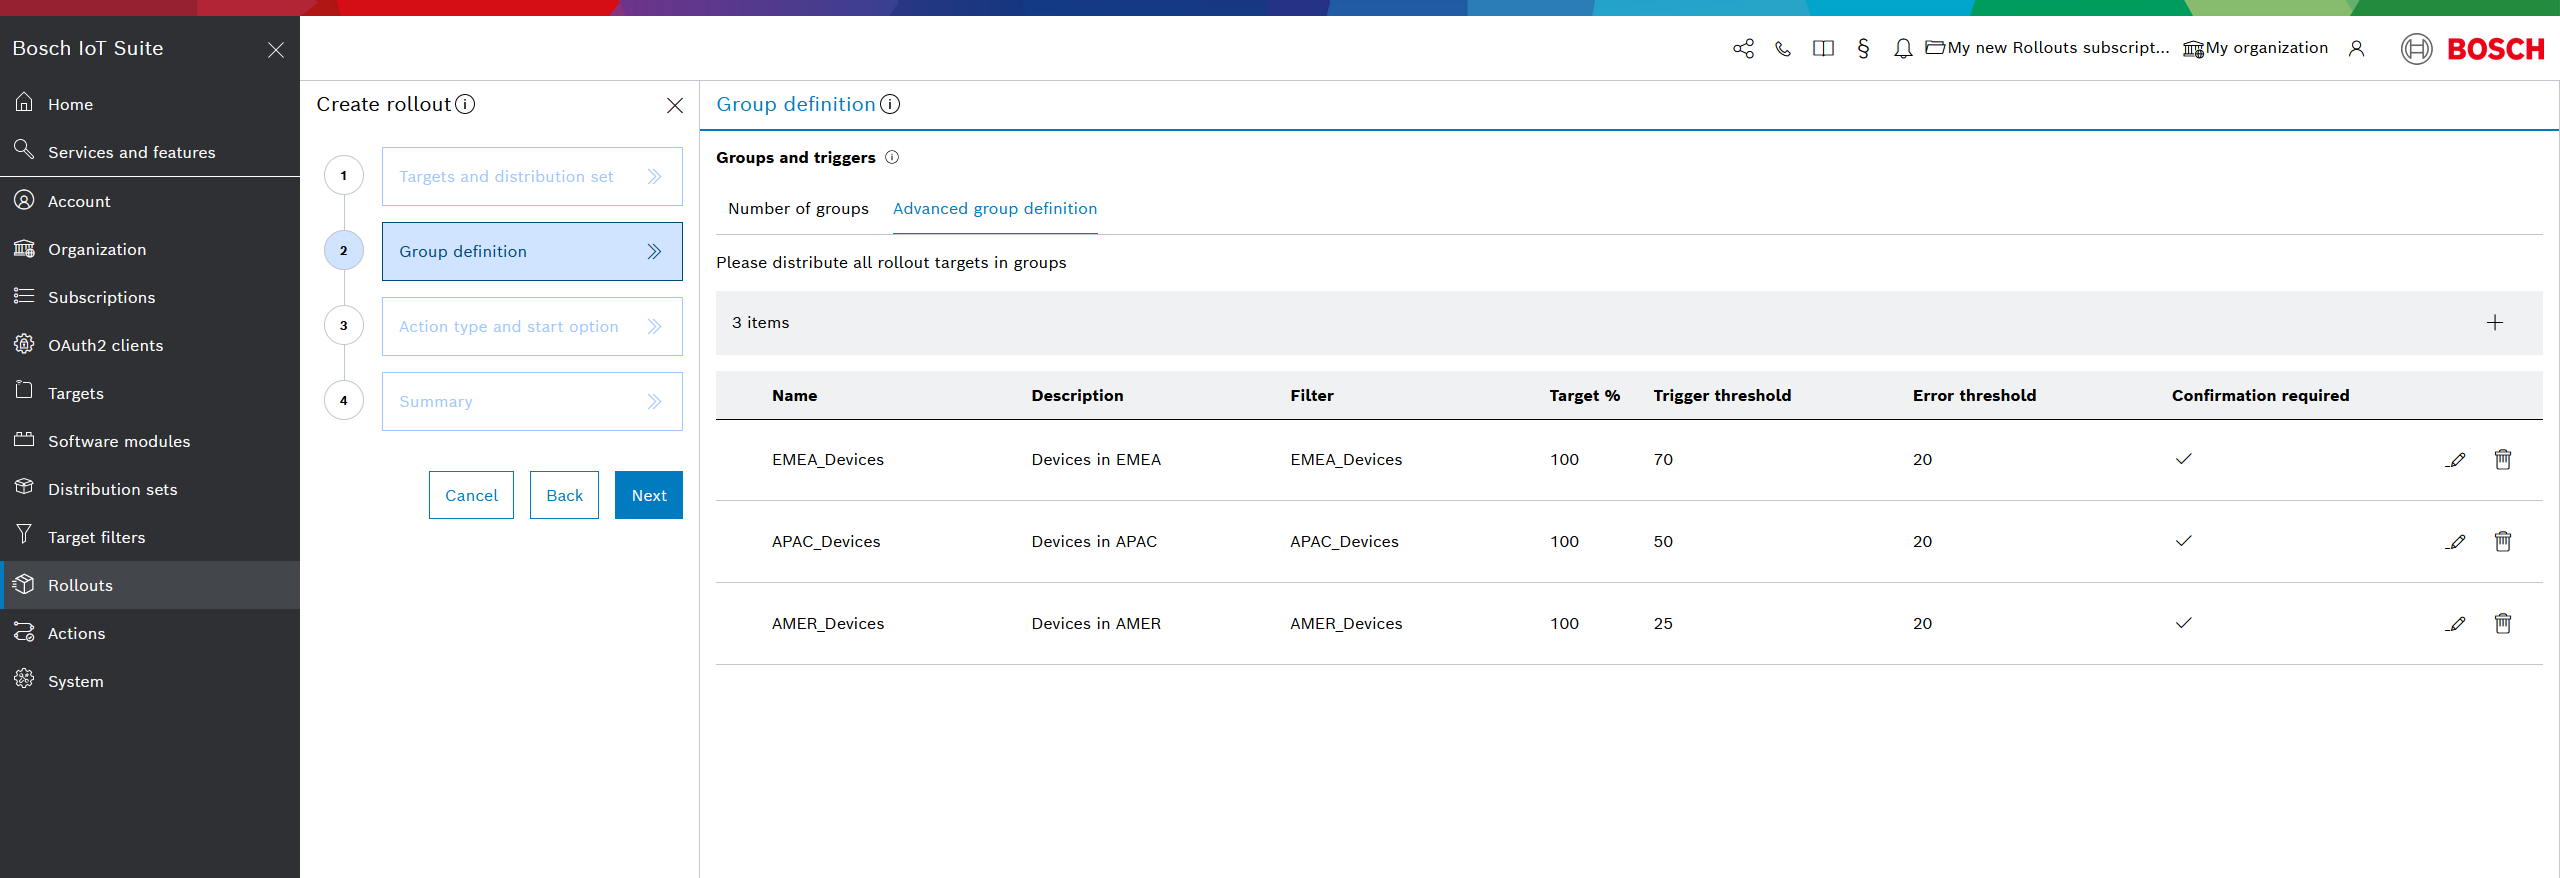
- Create a sub-group for each of our target regions (EMEA, APAC, and AMER). i.e. 3 rollout groups using the 3 target filters we created. Start with the first one by clicking the + icon on its right side.
- Type in a user-friendly Name for the group e.g. EMEA_Devices
- Optionally, type in a Description.
- Choose the appropriate Target filter for the respective region. In our case it would be EMEA_Devices.
- Leave the Target percentage at 100%.
- You can change the Trigger threshold of the EMEA group to 70 i.e., wait until 70 % of the devices of this group were updated successfully before triggering the next group.
- Reduce the Error threshold to 20 i.e., pause the rollout immediately if more than 20 % of the updates of a group were not successful.
- You can leave the Confirmation required as enabled in order to ask each device to agree to the update process. However, consider the specifics as described in User consent flow.
- Click Add.
- Create the other two groups. You can change the trigger and error threshold for them.
- At the Action type and start option step, choose Forced and Auto.
- Review your settings and click Create.
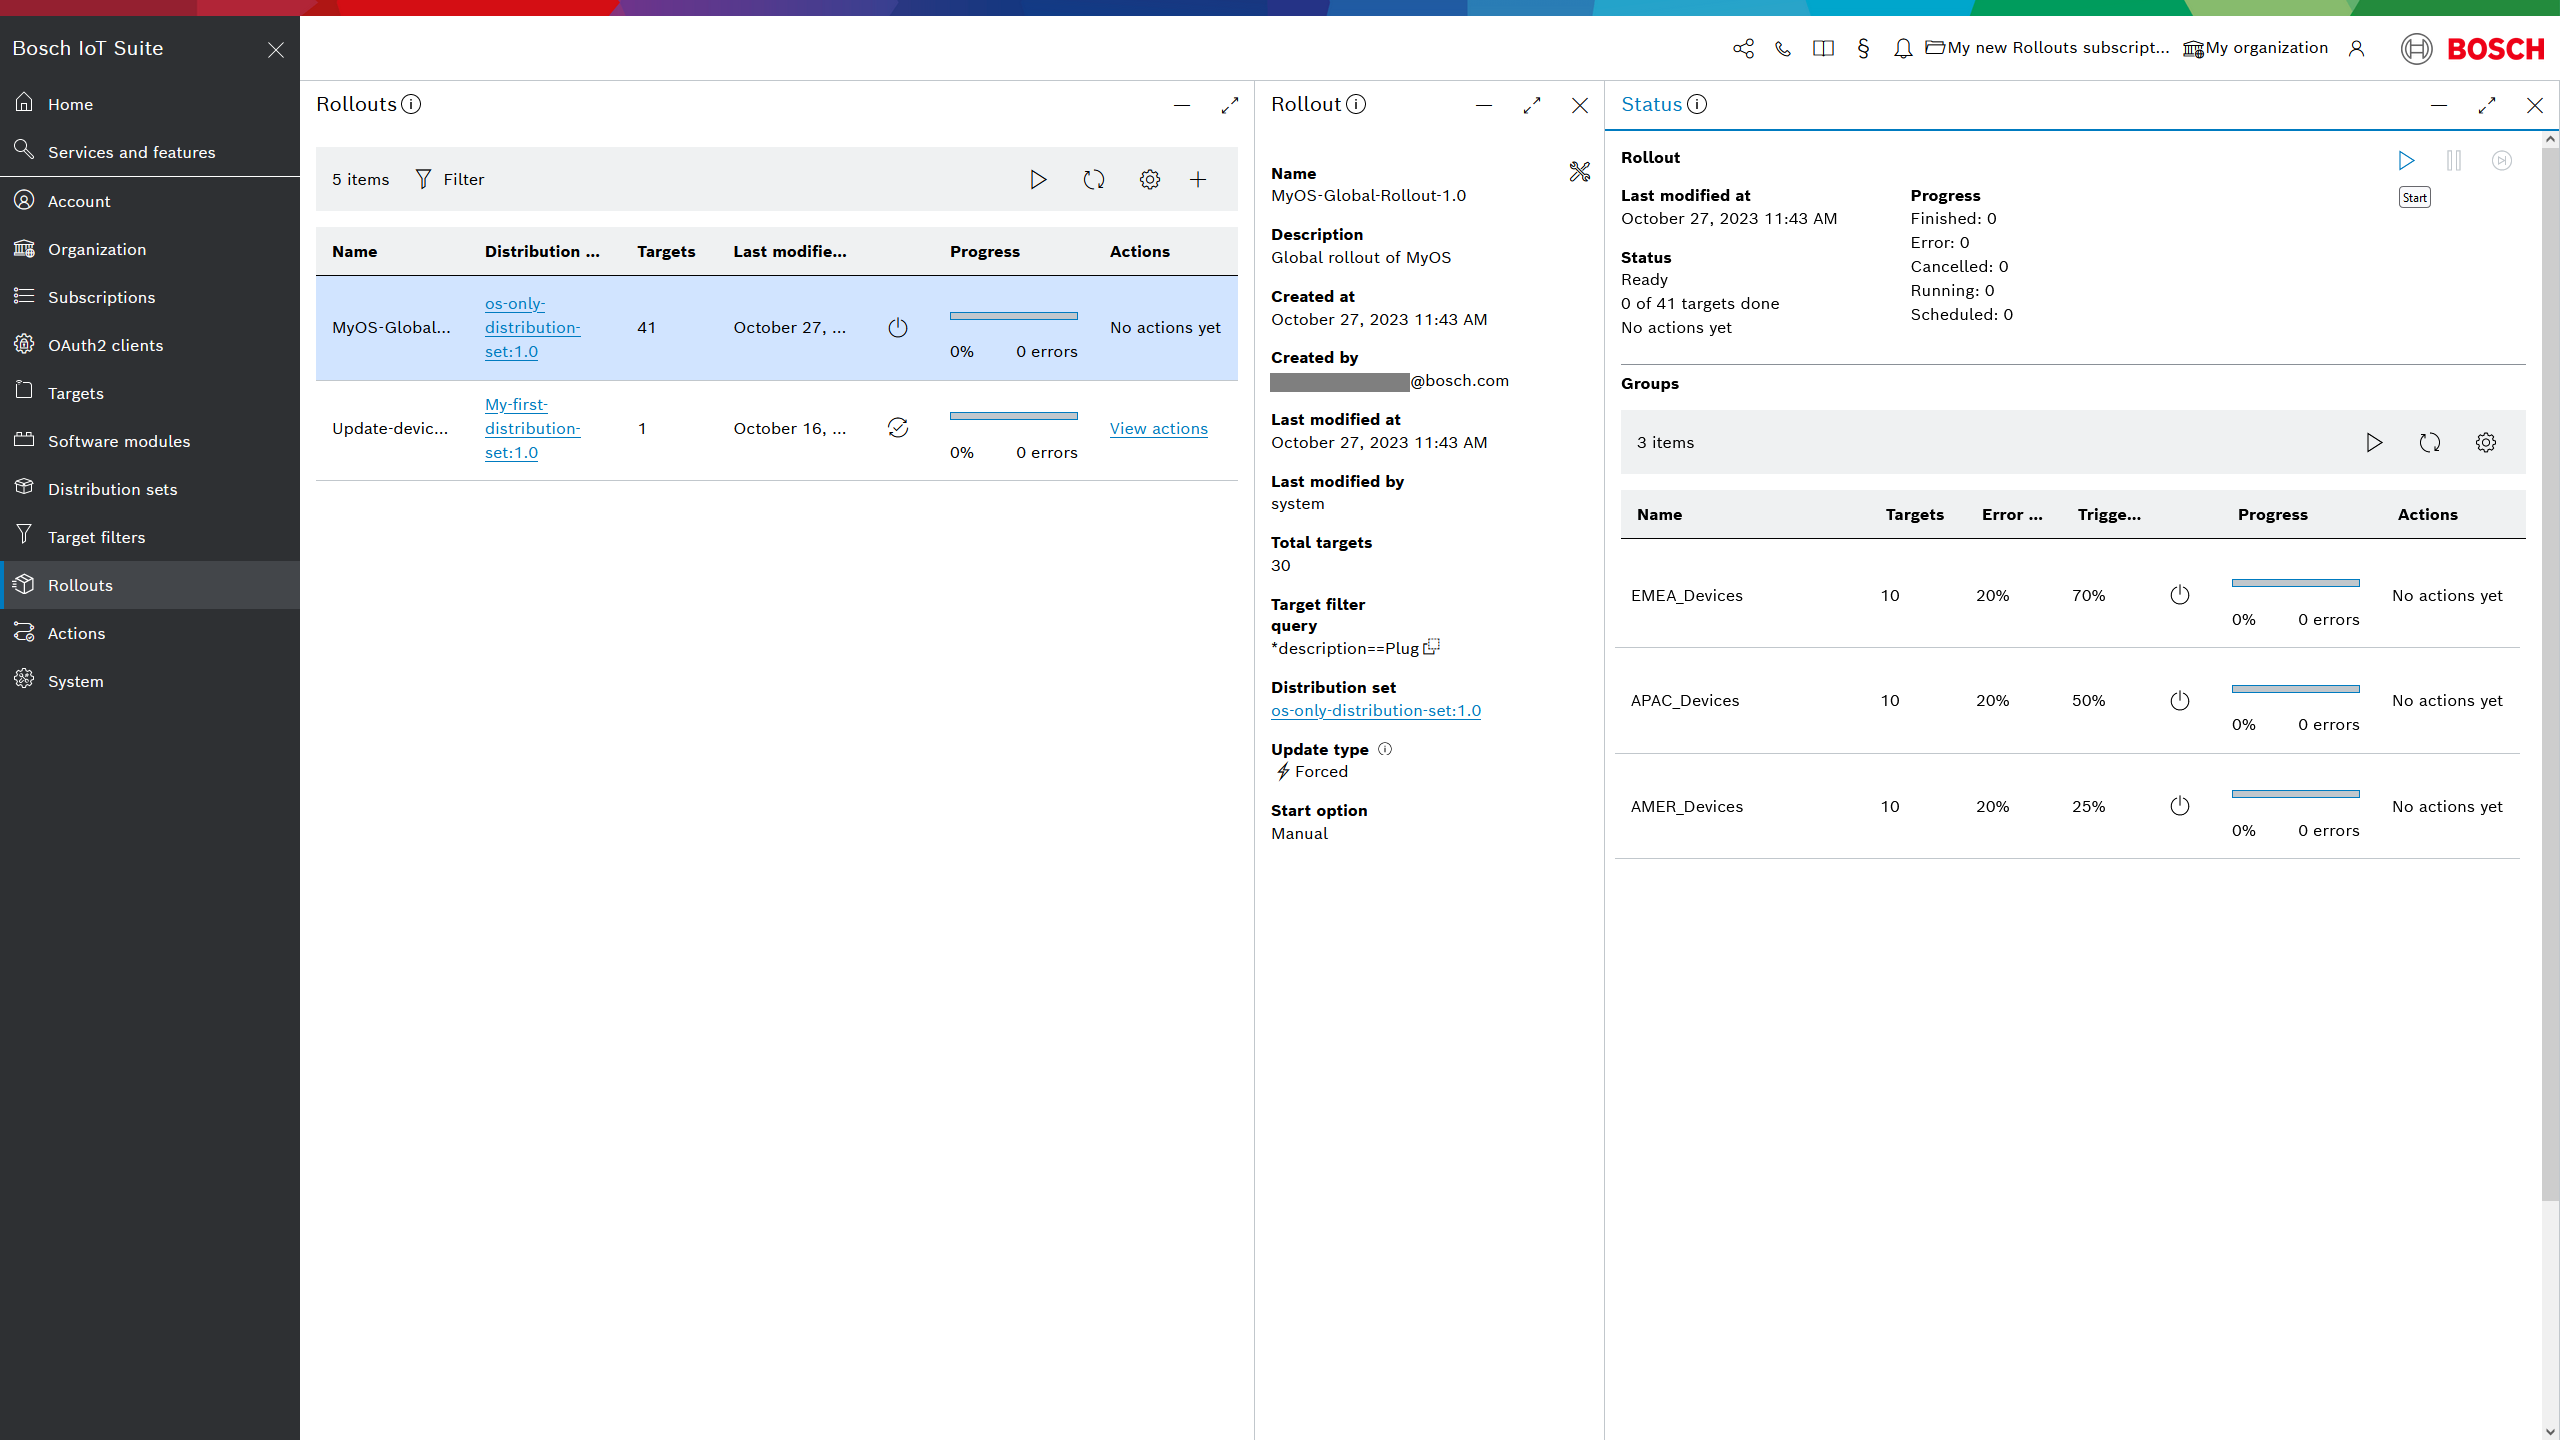
- The new rollout will be displayed as part of your Rollouts list.
- If you have enabled the Approval workflow (as described in the beginning of this page), you have to approve the rollout by clicking the Waiting for approval link in the rollout Status view. See details here. After that, you will be able to Start the rollout execution via the play icon on the right.
Please, consider that this guide shows just one scenario. However, there are many other fine-tuning options, such as manually selecting the relevant targets, defining simple groups within the rollout, etc.
- For a detailed guide, refer to Create a Rollout.
- To learn how to manage an already created rollout, refer to Manage a rollout.
Via Management API
A rollout can be easily created using the following call.
On the top level, we have to specify the distribution set we want to install, a name and description of the rollout campaign, as well as a filter query containing all affected devices.
The request shown in the example applies advanced group definition to further specify how the update should be rolled out.
There, we define three groups for the three regions, using the respective filter queries.
Finally, we can tweak the trigger- and error-threshold.
1: Create the rollout
2: Approve the rollout
If you have enabled the approval workflow, the rollout has to be approved before it can be started.
Additionally, a remark can be given.
Note: The user needs the APPROVE_ROLLOUT role.
curl 'https://<HOST>/rest/v1/rollouts/<RO_ID>/approve?remark=Formal+approval+given' -u "<TENANT_ID>\<USERNAME>:<PASSWORD>" -i -X POST 3: Start the rollout
Now that the rollout is approved, it can be started with a single API call.
curl 'https://<HOST>/rest/v1/rollouts/<RO_ID>/start' -u "<TENANT_ID>\<USERNAME>:<PASSWORD>" -i -X POST 